1. Introduction
Welcome to the Bungie.net help page! If you have questions or are having problems with our site, you have come to the right place. Throughout these pages you will find detailed information about every piece of the Bungie.net site. If you're looking for help improving your Halo skillz, you won't find it here. However, you will find a wealth of information covering everything from creating new accounts to using our new forums.
Here's a quick overview of what you will find in this section:
- 1. Introduction
- 1.1 Help index
- 1.2 Contact & Support Options
- 2. Site Overview
- 2.1 System requirements
- 2.2 Getting around the site
- 2.3 Player Hub
- 2.4 Message Center
- 2.5 Blocked User List
- 3. Windows Live ID
- 3.1 Account Creation
- 3.2 Changing Your Email Address or Password
- 3.3 Multiple Windows Live IDs
- 3.4 "Unlinking" Your Windows Live ID
- 4. Accounts & Settings
- 4.1 Creating an Account
- 4.2 Public vs. Private Information
- 4.3 Bungie.net Display Name
- 4.4 Profile Customization
- 4.5 Personal Information
- 4.6 Blocked User List
- 4.7 Saved Threads
- 5. Xbox Live
- 5.1 Linking Your Xbox Live Gamertag
- 5.2 "Unlinking" Your Xbox Live Gamertag
- 5.3 Gamertag Frequently Asked Questions
- 5.4 Gamertag Privacy
- 5.5 "Live Friends"
- 6. Stats for Halo 2 and Halo 3
- 6.1 Content Availability
- 6.2 "My Stats"
- 6.3 Player Stats
- 6.4 Game Stats
- 6.5 Game Viewer
- 6.6 RSS Feeds
- 6.7 Bungie.net Member Status
- 6.8 Questions & Troubleshooting
- 7. Groups
- 7.1 What is a group?
- 7.2 Who can create or join a group?
- 7.3 Warning
- 7.4 Group Search Function
- 7.5 Group Administrators
- 7.6 Group News
- 7.7 Group Settings
- 7.8 Group Forums
- 7.9 Group Resources
- 8. News
- 8.1 Reading News
- 8.2 Searching News
- 8.3 News Search
- 8.4 Submitting News
- 9. Forums
- 9.1 Forum Index
- 9.2 Topics
- 9.3 Reading Forum Posts
- 9.4 Creating a Topic
1.2 Contact and Support Options
If, after reading through this lengthy help section, you still can't find the answers to your problems...well, it might be a personal thing. Then again, maybe you do have a legitimate issue that we simply aren't aware of. In that case, you have a few options.
To report a bug with Bungie.net, please send a mail to bnetbugs@microsoft.com. Please try to provide as much information as possible - what you were doing when the bug happened, the time, the date, what error message you received, etc.. The more information you provide up front, the easier it will be for us to track down the offending piece of code and make things right.
If you just want to contact us, then you should visit the Contact Us page for the appropriate information.
Please note that Bungie.net is NOT a support destination for Bungie games or products. If you need help with a game, please consult our SUPPORT PAGE. You will find links to the right places to go for your specific issue. Please also note that Bungie is not able to provide support for any issues regarding Windows Live ID. Any problems with your Windows Live ID should be directed to the Windows Live ID support site.
2.1 Recommended System Requirements
Creating an online destination that delivers a great experience for anyone who visits it, despite their connection speed, hardware or software configurations, isn't an easy task. In the world of computers, there are an almost infinite amount of variables that can affect the user experience from one person to the next. When we set out to design this site, we had to pick specific target levels of supported configurations that span the majority of our users and then work backwards from there. This means that some hardware/software configurations will deliver the ideal Bungie.net experience, exactly as we want, while other configurations may result in a functional, but less than ideal experience.
Our two main primary supported browser/platform combinations are Windows/Internet Explorer and Mac/Safari.
However, there are plenty of other browsers that should work fine at the time of release. For Windows based machines, most current generation browsers should perform as expected, with specific testing being done on the latest versions of Opera and Netscape/Mozilla 6+. Mac machines running Netscape/Mozilla 6+ have also been tested and perform properly.
In general, Bungie.net should work properly with any browser that is HTML 4 and fully CSS 2 compatible. Any unsupported browsers (pre-CSS 2 or other) will downgrade into a near text-only experience. The core content is still available, but your experience will be a fraction of what we have intended.
Fully Compatible Browser/Platforms: (ideal experience)
- Windows XP, 2000, ME and 98 with IE 7 and 6, Firefox 2.0, Opera, Netscape
- Mac OS X with Safari 1, Firefox
Mostly Compatible Browser/Platforms (mostly ideal, may experience some small issues)
- Windows XP, 2000 and 98 with Mozilla based browsers (Netscape 7, 6 and latest Mozilla build) plus Opera 7
- Mac OS X with Netscape 7 and 6
- Mac OS 9 and 8 with Netscape 7 and 6
Partial Compatibility (degraded experience, almost text-only in some cases)
- Windows XP, 2000 and 98 with IE 4, 5.0 or Netscape 4.7
- Mac OS X with IE 4 or Opera 6
- Mac OS 9 or 8 with IE 4 or Opera 6
Not Supported (at time of launch):
- Handheld devices
- WebTV
- Linux/Unix
- All others not listed above
If you encounter unexpected results using a supported platform/browser combination listed above, please report it by sending a mail to bnetbugs@microsoft.com
Screen Resolution
Bungie.net was built to work best on a screen resolution of at least 1024x768pixels. Of course the site will still work on smaller resolution screens, but you will have to scroll horizontally to get all of the main content.
Windows Live ID
If you plan to login to our site (and you should!) then you will be required to obtain a Windows Live ID. This is a free service which allows you to create one central secure online identity and use it at participating sites. The only requirement is that you must have a valid email address in order to get a Windows Live ID. This is covered in more detail in the Windows Live ID section of help.
Cookies & Javascript
In order to have the best experience with this site, you should ensure that your web browser has both Cookies and Javascript enabled. You'll know that something is wrong if you get spontaneously logged out or your browser behaves strangely with this site. To enable cookies in IE on Windows go to Tools > Internet Options > Security and select Custom Level. Scroll down to the Cookies heading and make sure Enabled is selected. To enable cookies in IE on the Mac, go to Edit > Preferences > Cookies and adjust the "When receiving cookies" option. For Navigator on both Mac and Windows select Edit > Preferences > Advanced and select the "Accept all cookies" option. Enabling Javascript (which is generally on by default) is found in similar locations. You're on your own for other browsers. Good luck!
Javascripts are not required to use our site, but we have utilized them to deliver a better online experience and allow for enhanced navigation through our site. We will never use javascript or any other technology to deliver pop-up ads or otherwise force unwanted information on our users. All of our javascript enabled functions have traditional "click-throughs" behind them.
Plug-Ins
Bungie.net currently does not rely on any outside plug-ins or technology to deliver our core content. You will need a few additional apps to fully enjoy some aspects of our site, but they are not traditional plug-ins. Acrobat Reader is required to view online game manuals while some type of media player is necessary to play any audio or video files we have to offer. In the future we may incorporate plug-ins in order to further enhance our content offering but it will never be a requirement.
2.2 Getting Around the Site
Top Nav Bar
The Top Nav Bar is the primary means of getting around on our site.

There are six major menu items which represent a major piece of the Bungie.net universe. By clicking on one of these buttons, you will jump directly to the main page of the corresponding section.
Projects
Learn about up and coming Bungie products, or look through games that we have developed in the past.
My Stats
If you are logged in, and you have linked your Gamertag, go here to see the latest carnage that you have wrought!
Forums
Want information fast? Want to mingle with the Bungie.net community? Then we have a forum for every taste, whether that is to discuss the latest news or to discuss Old School Bungie games.
Community
Go here if you want to find a Gamertag of an enemy (or friend) or if you want to find a specific Bungie.net user name. You will also see the latest news here. This is also the gateway into the broader family of Bungie fan community sites all across the internet as well as our own internal 7th Column “Groups” network.
Inside Bungie
Ever wonder what Marty looks like? What snacks Frankie likes to enjoy? Perhaps you think you are crazy enough and would like to see if there are positions available on the team. Peer inside Bungie…if you dare.
Support
You need help and lots of it. Here is where we defer responsibility to those who care about your whining. These links can also be found at the bottom of every page.
Additional Navigation
The large Bungie logo is a quick ticket back to the "home" page from anywhere on the site. Click it and you'll magically be transported back to the main page.
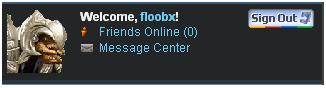
Your login name will always be displayed in the top right hand corner (assuming you've logged in) along with your Gamertag and current friends online (if enabled - this is explained more in the "Xbox Live" section of help). The Windows Live ID Sign-In/Sign-Out button will always be on the right side.
2.3 Player Hub
Once you have created your account and are logged in to Bungie.net, you will see your avatar and name at the top right of each page. If you click your avatar you will go to your very own Player Hub! If you then select “Profile Customization” from the menu you will be able to make any changes to your information whenever you need to. You can edit the information displayed in your profile or adjust your current web settings as needed.
Whenever a user clicks on your login name anywhere on the site, they will be taken to your personal profile. This page contains all of the personalized information entered during the account creation process and will only contain the information that you wish to have public. Consider this your own personal billboard, a way of advertising yourself to the rest of Bungie.net and giving people a glimpse into who you are. This information can be changed at any time by going your Player Hub and selecting Profile Customization.
Live Friends
Once you have linked your Xbox Live Gamertag to your Windows Live ID, you will have access to your friends list while using our site. The Live icon under your name and next to your avatar, will display the current number of friends online next to it. When clicked, it will take you to the "Live Friends" tab on your profile page. This page will show you your friends list as well as who is currently online and which games they are playing. More information on the Xbox Live functionality of Bungie.net is explained in the Xbox Live section of help.
The Xbox Live Friends list is private information and is not viewable by anyone other than yourself.
2.4 Message Center
This is your own personal inbox on Bungie.net. Registered members of our site can send messages to other users without having to leave Bungie.net. When you visit your own messages page, you'll see a list of current available messages. The messaging system behaves very similarly to our forum system and is described in more detail in the forums section of help.
If you visit another member’s profile page, you will not see their inbox. Instead, you will have the option to "Message this User" which allows you to compose and send a message to them.
2.5 Blocked User List.
See Section 4.6 for more information or go directly here:
Blocked User List
As you already know by now, Bungie.net uses the Windows Live ID as the primary means of logging in to the site. Windows Live ID is a service provided by Microsoft and as such, Bungie Studios has no interaction or control over any issues relating to a user's Windows Live ID. All of your information that is obtained when you create a Windows Live ID is outside of our realm, and it remains completely confidential. We have no way of knowing what your password is. If you lose it or forget it, you'll have to get help from the Windows Live ID support site, not us.
Like many people, you may be wondering why we decided to use Windows Live ID and build our system around this technology. Suffice it to say there are a lot of technical reasons, and some really cool feature reasons, why this decision was made.
Before reading any further, please take a look through our Windows Live ID Frequently Asked Questions. You'll find everything you want to know about Windows Live ID and it's relationship to Bungie.net.
3.1 Account Creation
If you want to participate in our forums, submit news to share with our readers, or get the most out of our Xbox Live Stats systems, you will have to be logged in as an authenticated user on Bungie.net. In order to create a Bungie.net account, you need to have a Windows Live ID. When a first time user comes to our site and clicks the "Sign In" button, they will be taken to a standard Windows Live ID login screen which will prompt you for your Windows Live ID email address and password. If you do not have a Windows Live ID, all you have to do is click on the "Get a Windows Live ID" link in the lower left corner of the box. If you do already have a Windows Live ID and you have already been to Xbox.com and linked your Xbox Live Gamertag, make sure you use the same Windows Live ID here to avoid potential headaches down the road.
Establishing your Windows Live ID is all done through the Windows Live ID service and website. Bungie.net has nothing to do with this process. All our site cares about is whether or not you have one when you come to log in.
Once you've got a Windows Live ID established, you can continue the sign-in process and proceed with creating your Bungie.net account. This is discussed in more detail in the next section, "Accounts & Settings."
3.2 Changing Your Email Address or Password
In some cases, it may be necessary for you to change the email address that you've associated with your Windows Live ID. Maybe you're consolidating multiple Windows Live ID or perhaps you mistakenly used a different one over at Xbox.com when you linked to your Xbox Live Gamertag. This email address, and your password, can be changed by visiting the Windows Live ID Member Services Page.
3.3 Multiple Windows Live IDs
You can only use one Windows Live ID on our site. The Windows Live ID you use to create your Bungie.net account is the one that will stay with you forever. If you mistakenly used the wrong Windows Live ID, or used a different one on Xbox.com to link your Gamertag, continue reading the help section for information about what options are available to you.
3.4 "Unlinking" Your .NET Passport
The latest information we have from Xbox Live is that it is not possible to "unlink" a Windows Live ID once it has been associated with your Bungie.net User Account. If you accidentally screw up during your Bungie.net account creation or decide you want to switch to a different account, there's not much you can do. In most cases, it may be easier to just create a new Windows Live ID and start fresh.
In order to have any real fun at Bungie.net, you are going to have to create an account. Here's what you need to know!
4.1 Creating an Account
When you log in to Bungie.net for the first time, after creating a Windows Live ID, you will be taken through a series of steps to establish your new Bungie.net account. Unlike the information you entered when you created your Windows Live ID, this is all information that will live on Bungie.net and will create your identity on the site.
Some of these "settings" are used to customize your experience on the site while others are merely information blurbs that will make up your user profile page that all other Bungie.net members will look at. Consider it your own personal billboard, a way for people to get to know the real you, the person behind the keyboard. Or you can leave it all blank and remain a mysterious stranger shrouded in darkness. The choice is yours.
You can change any of your web settings and account profile information by clicking on your avatar and then selecting “Profile Customization” from the menu.
4.2 Public vs. Private Information
You are asked to enter a variety of information during the account creation process on Bungie.net. Some of these items are required, such as the account identity fields, while others are completely optional, like the "personalize" data. You have control over what, if any, "sensitive" information will be publicly viewable to other Bungie.net members. Here's an overview of the various personal information on our site and whether or not it is visible to others:
- Windows Live ID settings/information (password, email address, etc..) = Private (not even accessible by Bungie.net)
- Bungie.net display name = Public
- Real Name = Private
- Preferred Email = Public/Private (user controlled in the Web Settings section)
- Location = Public
- Profile Customization (Signature, Background, Home Page) = Public
- Gamertag = Private/Public (user controlled in Web Settings section)
- Friends List = Private
4.3 Bungie.net Display Name
Your Bungie.net display name is who you will come to be known as while using the site. Everything you do from posting in the forums to submitting news will all be associated with this unique name. (Remember, your Windows Live ID "identity" is all behind the scenes and secret). Once you've created your login name, it is more or less set in stone and it will follow you until the ends of time. This means you should be super careful when picking your name - make sure it's not something you're going to hate in a few days and be really sure you don't misspell it! (more information about login names can be found in the Windows Live ID / Account FAQ page.)
There are a few rules to keep in mind when creating your Bungie.net login name:
- The name must be unique - If an account with the name you want already exists, you'll be prompted to pick another name. Spaces and capitalization do not have any impact on the uniqueness of the name.
- The name must be 16 characters or less
- The name cannot contain any invalid characters - only letters and numbers are accepted. Spaces are ok, but not at the beginning or end of the name. It must start and end with a letter or number. No punctuation characters are allowed.
4.4 Profile Customization
Custom Avatars
An "avatar" is a graphical representation of you that will show up whenever you make posts in our forums. It doesn't serve an official purpose, but it is a fun way to customize your identity and add a little spice to your forum activity. Spice is nice, right? We have an ever growing library of avatars to choose from, and we'll be adding more new ones as we get inspired. You can come back and pick a different avatar whenever you want, simply click on the Profile Customization link in the Player Hub menu, and you should see Custom Backgrounds and Avatars at the bottom of the screen. Remember to save after you have made a selection.
We do not allow users to upload their own custom avatars. In the near future, we will likely create a system to allow users to submit avatars to us for review, and if we like it, we might add it to the site. However, users will not have the ability to use their own custom avatars.
Custom Backgrounds
You can also select your own personal background for when people view your profile. Simply click your avatar at the top of the screen, click Profile Customization, and Custom Backgrounds and Avatars should be at the bottom of the screen.
4.5 Personal Information
Once you have finished establishing your identity on Bungie.net, there are a series of optional fields you can enter to personalize your account. These aren't required, but they do give you the chance to add some personal flavor to your online profile. When someone clicks your name on the site, they will be taken to your personal profile page which will display any information you've entered into the account personalization section.
Any of these fields can be edited or changed at any time by clicking on the ‘Profile Customization’ link in the Player Hub Menu and the selecting Personal Information from the next menu.
Email
This is a required field, but you are not required to display it. Users may hide their email from the public by simply selecting the Hide radio button and clicking save. Please use caution when making this selection. If you elect to have your email public, anyone who views your profile page will be able to see your email address. Bungie will never share your email address with anyone, ever. But if you choose to, be prepared for the possible negative outcomes.
Homepage URL
If you have a personal webpage, a clan page or just a site you really like, you can list it here for others to see.
Signature
The signature is a blurb of text that will appear at the bottom of the pop up window if someone hovers over your avatar in one of our fine forums. It is like a signature, only it doesn't have to be just your name.
Gamercard
The web settings options allow you to customize the behavior and functionality of Bungie.net. Currently, there are two options under your control.
Xbox Live Gamertag Show / Hide
This check box determines whether or not other users will be able to see your Xbox Live Gamertag or not. Once you've linked your Gamertag to your Windows Live ID, it will become integrated into your Bungie.net account and give you access back to the Xbox Live service. Your Gamertag will always be visible to you when you are logged in, but you can hide it from others if you choose. Click 'Show' to allow your Gamertag to be publicly visible, click Hide to keep it private.
The process of linking your Gamertag along with the special features this offers is explained in the "Xbox Live" section of Help.
Show Status in Halo2 Show/ Hide
Turning this on allows your name to be displayed differently in Halo2. You will see a bungie.net logo behind your Gamertag in the pregame/postgame lobby and the matchmaking progress screen.
4.6 Blocked User List
Let’s face it some people are just annoying and it is nice to be able to shut these people out. Fortunately there is a way to do this on Bungie.net! If you want to Block a user from sending you private messages, simply click on “block user” on their private message.
Perhaps you are feeling guilty for blocking someone, or perhaps you blocked someone by mistake and you want to unblock them. In your Player Hub, go to Profile Customization, then go to Blocked User List. Here you will see the names of users that you have blocked. Simply click delete next to the user that you want off of this list, and like magic, they are unblocked!
4.7 Saved Threads
Sometimes you just need to keep up with current events that are happening on the forums. To save a forum thread you must be logged in then, simply go to that forum and click “Save Thread.” It is that simple! To view your saved threads, click on your avatar, then click on Saved Threads to see your collection of bookmarks.
One of the benefits of using the Windows Live ID service is the ability to "link" your Xbox Live Gamertag to your online identity. By linking your Gamertag, you will be able to stay in touch with your Xbox Live Friends list while you're using our site. Whether you're engaging in a heated forum discussion or browsing through a collection of concept art, you'll always be one click away from knowing if any of your friends are online playing an Xbox Live enabled game. This is just the tip of the iceberg. You'll have to stay tuned to Bungie.net for future news regarding cool Xbox Live connectivity options.
You do not have to link your Gamertag now, or ever for that matter. It's a purely optional feature that we've implemented to keep our users connected to their Live friends. If you don't have Live now, or you don't want to link your Gamertag yet, it's no problem. You can go to Xbox.com and complete the linking process at any time. As long as it's the same Windows Live ID you are using at Bungie.net, everything will work out just fine.
5.1 Linking Your Xbox Live Gamertag
Establishing the connection between your Xbox Live Gamertag and your online Windows Live ID is a simple, one-time-only process, that can only be accomplished through the Xbox.com website.
What you'll need:
- A Windows Live ID account (make sure this is the same one you're going to be using at Bungie.net)
- Xbox Live Account
- To verify your identity on Xbox.com : (all of these are available through your Xbox dashboard)
- Name of credit card holder on the Live account
- last 4 digits of the credit card
- phone number
- postal code
Once you're ready, head over to Xbox.com to the Link Gamertag page. You'll be prompted to first sign in with your Windows Live ID. If you're a first time visitor to Xbox.com, you'll have to accept their terms of use and create a quick account. (just your email address).
Enter the required information, click on "continue" and voila' - you've just linked your Gamertag!
If you have any problems with this process, follow the support options given on Xbox.com.
5.2 "Unlinking" Your Xbox Live Gamertag
What happens if you accidentally used a different Windows Live ID at Xbox.com and at Bungie.net? You won't be able to connect your Bungie.net account to your Gamertag, which is a real bummer. The easiest way to fix this dilemma is to go back to Xbox.com and login using your Bungie.net Windows Live ID. When you log in with that new Windows Live ID, you should be able to go through the Gamertag linking process again and attach it to the new account. The only other alternative is to create a new Bungie.net account, using your Windows Live ID that was used at Xbox.com, in which case you'll lose your Bungie.net login and your entire identity. That's a bigger bummer for sure.
5.3 Gamertag Frequently Asked Questions
You've probably got more questions about all of this high tech linking mumbo jumbo. Not to worry. Take a look at our Frequently Asked Questions and put your mind at ease.
5.4 Gamertag Privacy
You have the choice as to whether or not you want your Gamertag to be publicly visible to other members of Bungie.net. You will have the option of making it visible or hidden during the creation of your account. You can go back and change this at any time by clicking on "Profile Customization" in the menu.
5.5 "Live Friends"
Once you have linked a Gamertag to your Windows Live ID that is associated with your Bungie.net account, you'll notice a few slight changes in the information displayed in the top of page navigation window. Your Gamertag will appear in the pop up if anyone mouses over your avatar, immediately following your Bungie.net login name. Don't worry, if you chose to keep your Gamertag private, nobody else can see it!
Below your name you'll notice a small Xbox Live friends icon, followed by a number. This indicates the current number of friends you have online playing Xbox Live. This information is updated regularly and will change as your friends join and leave the Live service. To get more info and find out exactly who is online and what games they are playing, click the icon and you'll be transported to the "Live Friends" section of your personal Profile Page. (You can also click on your avatar to get to the same page).
The "Live Friends" list found on your personal profile page is only visible to you; this information is confidential to each user.
With the release of Halo 2, Bungie.net activated a new feature allowing players to review their Xbox Live activity here on our site. If you have an Xbox Live account and participate in any games on Xbox Live, you're able to come to Bungie.net and review the results as well as some general information about your Live account profile. You can check out the latest game rankings for each playlist , compare your level with your friends, review the actual post-game carnage report for games you've played and more.
6.1 Content Availability
Halo 2 player stats, and post game carnage reports are able to viewed by anyone who visits Bungie.net. An account is not required to browse through stats of other players, however, there are a few pieces of additional content that can only be enjoyed by people who have logged into the site with a valid Bungie.net account that has an Xbox Live gamertag associated with it. Additional information is provided below.
6.2 "My Stats"
If you have a Bungie.net account and you've linked your Xbox Live Gamertag (see section 5 Xbox Live) then when you click the “Stats” item in the Top Nav Bar you will see your stats for Halo 2. This is a handy link that allows you to go directly to your personal stat profile page. This page shows some overall information about your performance on Xbox Live including your current level in each available playlist. You will also have access to your "Halo 2 Friends" which is a listing of all your Xbox Live friends who have played Halo 2. This page lists each friend, and their current presence status on Xbox Live. This is only viewable by YOU and nobody else is able to access your list of Halo 2 friends.
6.3 Player Stats
Everyone who has an Xbox Live account and plays Halo 2 on Live will have a player stat page created here on Bungie.net. Guests who play online will NOT have this page though they will still show up in the post game carnage report.
The Games tab contains a listing of literally every game a player has played on Xbox Live. Yeah, crazy huh? For now that's our goal, if we end up having to scale back we'll update this text. You will see each game, in chronological order, along with the name of the game that was played, the date/time, the map, which playlist it was in and your overall result. If you click on an individual game, you'll be taken to the full post game carnage report. This is the same information displayed in the game itself so you can browse through every stat, days and weeks after the game took place.
Here is an example of a Player Stats Page:
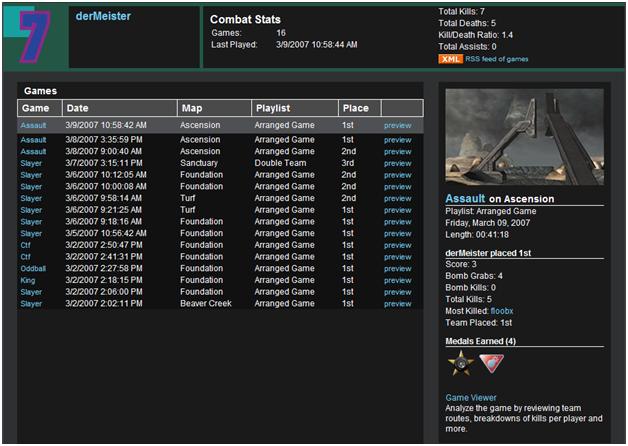
There are a number of ways to find a Halo 2 player stat profile page. On the right side of the Stats Page there is a search option to locate any player by Gamertag. Type in the Gamertag in question, click “search" and if we have records for that player, you'll be taken to their stat profile page.
The page itself contains a few different pieces of information. At the top of the page is the players Halo 2 emblem. The emblem used at the last time a game was reported is what is displayed. The combat stats overview shows how many games have been played and the date and time for last game played. Beside this is a tally of your total kills and total deaths! Below the header is the overview of all the player's games played.
Preview
To preview a specific game, click preview next to the desired game. This preview will show up in the right hand column. This preview defaults to the last game played.
6.4 Game Stats
As we mentioned above, Bungie.net will be keeping an ongoing archive of as many games as we possibly can for every player who plays on Xbox Live. Once you click on a game in the game list on a player stat page, you'll be taken to the GameStats page. This page contains the full post game carnage report for the game in question as well as few other interesting tidbits. The header of each GameStats page displays the map played, a thumbnail of the map, the name of the game, the time and day of the game and the game length.
There are 5 total tabs for each game, which take stats found in the in-game version of the report. These are Results, Carnage, Breakdown, Field Stats, and Game Viewer.
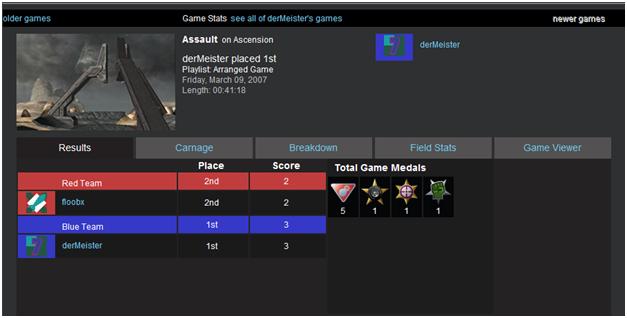
Results
This is the default tab and it allows you find out who won here. Medals awarded can also be seen here. A quick mouse-over of the medals will indicate which player earned which medals. Also, a quick mouse-over of player emblems will reveal a list of medals won and the most popular implement of destruction! If you are a BR lover everyone will know it now!
Carnage
Here is where you find the tally of kills and deaths.
Breakdown
On this tab you will find what weapons were used by each player. A graphical representation will be displayed for that player’s preferred weapon in that game.
Field Stats
This tab displays who killed who the most, interesting details such as bomb grabs, bomb kills and number of headshots.
6.5 Game Viewer
The game viewer is an awesome new feature that's still in its infancy but offers a very cool perspective on your past games. While on a GameStats page, you will see the Game Viewer button in the header of the page, to the right of the map picture. NOTE : You must be signed into Bungie.net with a valid account in order to utilize this feature.
The Game Viewer opens up a new window that basically gives you a visual rundown of the major events in your game. Let's go over what it is you're looking at... On the right side of the page is the list of all the players who participated in the game. If you come to this page from a particular player's page, that player will be selected by default. You can toggle to display the results of any individual player or all players. To the left of that list is the main view for the particular map the game was played on. Across the bottom of the map you'll see a visual timeline that shows the events over the course of the game. You'll see the killer vs. victim results spread out visually over time. Currently, the majority of the information presented in the map view area focuses on player kills. You'll see indicators displaying who killed whom (designated by player emblem), where they were on the map, and what weapon they were using (indicated by small weapon icon). The "killed by" weapons currently only display for hand held weapons. Kills due to grenades and vehicles are currently not specifically shown.
If the game was a CTF or Assault game, you'll have on additional option. Below the map image view you'll see some options to view the various capture routes. When selected, you'll be able to see the paths that a flag or bomb carrier took to achieve victory.
Beneath the main view are a series of additional camera angles to allow you to see all the nooks and crannies on each map.
6.6 RSS Feeds
An extra bonus for registered Bungie.net members is the ability to subscribe to an RSS feed for your personal stats. RSS is way of getting news or headlines from web sites in a format that's readable by special RSS reader software. For Bungie.Net, you can subscribe to your very own RSS feed that gives you an up to date listing of the Halo 2 games you've played in on Xbox Live in the past week. If it comes up blank, chances are you haven't played games recently (or, in some rare cases, it's temporarily offline for maintenance). To get this functionality, you need to first link your Gamertag. Then go to your "Player Stats" page and look for the orange "XML" icon. That's the link to your RSS feed. You probably need a RSS reader to get any value out of this so go to your favorite search engine, get one, then follow the instructions provided by the reader.
In Bungie.Net, you will only be able to view your own RSS feed. However, we encourage you to share this link with others so that they too can watch your Halo 2 career.
For additional help with RSS feeds, these links might be useful:
6.7 Bungie.net In-Game Identifier
As a Bungie.net member, you have the option of having a special "Bungie.net" logo appear next to your name in the pre-game lobby screens of Halo 2 on Xbox Live. You can enable or disable this at any time by visiting your “Player Hub” page and then selecting Profile Customization, and then Personal Information. Select the radio button where it says "Show Status in Halo 2." You obviously have to have an active account in order to take advantage of this feature. Represent Bnet and let everyone know that you're a member of our site!
6.8 Questions and Troubleshooting
Please keep in mind that your Halo 2 Xbox Live stats will not instantly appear on Bungie.net. Depending on total activity and network traffic it would take a little while before your stats are visible.
If you have additional questions regarding the computation of stats and levels and how it all works behind the scenes, please review the Stat Overview document elsewhere on the site.
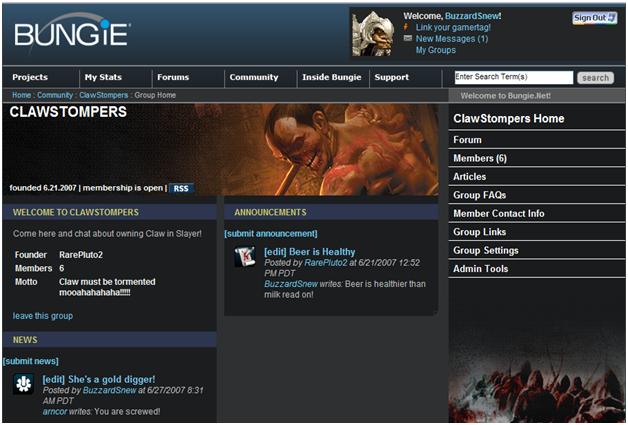
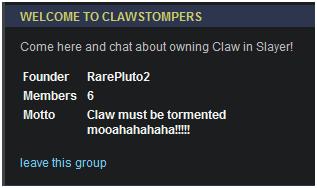
7.1 What is a group?
A group is a private web space within Bungie.net that is used for likeminded individuals to discuss and share their ideas. It can serve as a platform for discussion or for storing resource materials useful to the group. Typically, groups are a band of people with similar interests or sometimes, more importantly, similar geographical regions to facilitate multiplayer games on Xbox Live, or LAN.
A group will be on probation for 60 days if they have less than three active members. Should the group attain three or more members during this period of time, they will be taken off of probation. If a group does not meet this criteria they risk being deleted from the website. Groups with high memberships or high activity have the chance of making it into the Group Spotlight section on the Community Home page.
Your group membership will be visible by your avatar when you post in the Bungie.net forums, or if someone visits your player hub.
7.2 Who can create or join a group?
Anyone can start their own group provided that your Bungie.net account is at least 14 days old. To create a group you must log in, click My Groups under your avatar in the upper right hand side of the screen, and then click "Create New Group." We would strongly suggest that people that are new to the site seek out groups that already exist instead of trying to create their own. There is no reason to have a hundred groups of the same type when they could all merge and be that much stronger.
Anyone with a Bungie.net account can join a group. Groups may be private (which require permission by an administrator in order to join) or open to the public. To join a group, simply visit that group and click the "Join this Group" link. To accept a new member as an administrator; go to the Members page and click accept next to the user's name.
A good place to look for groups (or advertise your group) is on the Classified Forums page.
7.3 Warning
Please note that offense material, racist proclaimations or otherwise obscene or illegal behavior will not be tolerated. Bungie.net reserves the right to delete any group that is deemed inappropriate or offensive.
7.4 Group Search Function
To search for a group go to Community in the top menu bar, then select Group Finder from the drop down list. Here you will a search tool to look for specific (or not so specific) groups that you may be interested in. One may search groups either by the group name, the group founders name or by location. Each query may be ordered by group name, founder name, location, member count and creation date in either ascending or descending order. Upon entering your desired criteria, click the "Execute Group Search" button located at the bottom to initialize the search.
7.5 Group Administrators
The first administrator of a group is always the founder of that group. The founder can then promote others within the group to be administrators. It should be noted though that one should be cautious as to who they promote in this fashion. In the past some unknown administrators have sabotaged groups by kicking every member out of the group or by blacklisting everyone in a hostile group takeover. Should such a hostile takeover happen to your group, too bad! Cry about it and then move on. Bungie staff members are not responsible for your groups, nor can they restore order to your group when you have lost control; we are not your den mothers.
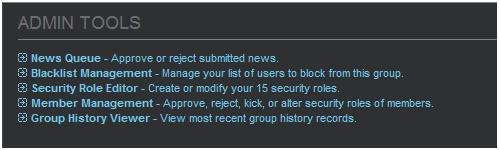
Group administrators can publish news, announcements, create articles, create links, FAQs and add member contact information. Administrators can accept or reject new members, blacklist troublesome persons or eject them from the group entirely.
Administrators have access to the Administrator Menu which grants them god like powers over a group. They can even change role names from Member and Administrator to anything they chose such as Peasants and Kings, or Ants and Magnifying glasses.
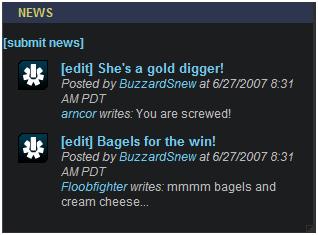
7.6 Group News
News appears on the front page of group, or may be accessed using the RSS feature (to activate just go to your group and click the RSS button on the home page). Any group member can submit news or announcements, but it is sole job of the administrators to accept or reject these submissions. To submit news as a regular member, click the submit news link on the Group Home page.
To see what news has been submitted you must be an administrator, and then all you need to do is go to Admin Tools in the right hand menu and select News Queue. News and Announcements can be edited or deleted at any time by clicking the edit button beside each article.
News and Announcements use the same editing tool. To differentiate between a news story and an announcement, one must select the correct news category. For news stories click "Statements" or "Memoranda" and for announcements click "Declaration" or "Directive."

7.7 Group Settings
Group Settings can be modified in the Group Settings menu item on the right hand side. Here, an administrator can change the Motto, the group description, the Group Skin, the location or even if the group is open or private. Once you have made your changes that you like click Save Changes. Keep in mind that these changes may not be seen right away as your browser has likely cached the old settings and loaded those; to force a refresh click Control + F5.
7.8 Group Forums
Any group member may contribute to the group forums by adding new threads, or replying to existing threads. There is no limitation on the number of new topics or number of replies a member can make. Just keep in mind that too much spam may earn you a blacklisting by the group administrator, or even a forced removal from that group.
Administrators will have access to the moderator toolbar in the forums that allows them to lock, pin or delete a thread. The reveal button is used to reveal members posts that have been blacklisted. They can also blacklist members from the forum should they choose to. Please note that administrators will not have special colored text, be thankful that you have absolute power over your group!

7.9 Group Resources
Administrators (or any member who has been granted permissions) may add information to their group resources in a variety of ways. Articles, or essays may be posted with theories or wild speculations, Group FAQs can be posted as well as Links and contact information.
8. News
Bungie.net is the first and last stop for any official news regarding Halo 3 or any other Bungie products. You'll also find that there are a lot of other things we like to talk about. From interviews with our team members to spotlighting community events, there's never a shortage of news to report.
In general we have two main types of news - "top stories" and "regular news." Top stories are "deluxe" stories in that they usually focus on larger, bigger topics and they contain pretty pictures. By comparison, regular news is sometimes generated several times a day and is meant to cover the smaller, day-to-day topics.
8.1 Reading News
The front page of Bungie.net displays a few pieces of important information for each news / top story:
- The title of the story
- The author (click the link to access the author's profile page)
- The day and time the story was posted
- Summary text
If news has been submitted by a Bungie.net member, instead of being written by one of our staff, you will also see text that reads, "So-and-so writes:" at the beginning of the story. All news will always be posted by Bungie.net staff, but sometimes the content within the story is written by someone else.
News for the current week, Monday through Sunday, is displayed on the upper part of the page along with the full summary text. News from the prior week condenses down to just the headline, day and time. Once a new top story is posted, the prior top story moves down to the secondary spot and only displays a headline, day and time.
To read the full contents of either a top story or a regular news item, simply click the news headline or click on the "Continues >" or "Full Story >" links. You'll then be taken to a page with entire story, in its full glory. If you want to discuss the story you just read with other Bungie.net members in our forums, click the "Discuss this story" link and you'll be transported to our news forum.
8.2 Searching News
If you're looking for a particular news story, there are a few paths you can take to find it. If it's a fairly recent top story, you can try clicking the All Stories link under the current top story. This will produce a page that lists the last few top stories, from most recent back to oldest. You can continue going backwards, 25 at a time, until you find what you want. You can only keep going back until you've reached 250 stories into the past.
The News Archive button at the bottom of the page works the same way, but for regular news. You can keep going back in time by clicking "Earlier Stories", 25 stories at a time, up to 250 stories into the past.
If you don't know how far back the story in question is or you don't really know what you're looking for, then the "search news" option is the way to go.
8.3 News Search
If surfing through hundreds of past stories is not your thing, you can try using our Search feature. Click the search button in the upper right hand corner of the main page. In the resulting page, select “News” from the drop down menu and then type in the text that you are looking for. Remember the more specific you are, the more likely the search will find what you are looking for.
8.4 Submitting News
Bungie.net allows registered users to submit their own news to be published on our site. Anyone who has an active account and is logged in can submit their own news story by clicking the "Submit News" button on the front page. However, only staff members can post directly to the site. News submissions by Bungie.net members will go into an approval queue where they will be reviewed by Bungie.net staff prior to being added to the front page. Each news submission is reviewed for content, relevance, and even grammar and spelling. Only appropriate news stories will actually be approved and appear on the site.
Top Stories are a little different. Only Bungie.net staff members can create and post Top Stories. Users can submit "regular news" only.
News Story Title
What do you want your news story to be called? This is a required field and is generally the first thing that readers will notice when browsing the news. Be creative and try creating a title that makes people want to read the full story. A news title can be up to 75 characters long.
Link Name
This is an optional field that was created to make life a little easier. By default, new news stories are automatically given a specific URL that contains a unique series of letters and numbers. Unfortunately it's not that easy to tell someone about a news story when you have to convey a huge jumbled mass of data.
For example, a typical story may have a link like this by default:
/news/Story.aspx?link=C61478B8-7957-46DF-951F-F55E41671DCD
Not very nice, eh? Now, suppose the news submitter decided to specify their own link name. In this case, let’s say the story is called "TestStory". Now the link is:
/news/Story.aspx?link=TestStory
Much nicer! Again, this is totally optional, but it does make it easier to share news links with others and remember them later. If you choose to create a link name, it must be unique. No other stories with can exist with the same link name. Also, the link name can only contain letters and numbers and can't exceed 75 characters.
News Category
What is your news story about? As described above, the category will be used to "file" the news story for easy searching as well as publishing the headline onto an appropriate sub-page (if applicable). Here's a quick overview of the various categories:
- Inside Bungie - news pertaining to Bungie in general, Bungie.net, etc.. - secondary headline appears on the "Inside Bungie" page
- Community - any news related to the Bungie community or 7th Column - secondary headline appears on the "Community" page
- Halo (all platforms) - news that pertains to the entire Halo universe - secondary headline appears on Halo 2, Halo PC/Mac and Halo page
- Halo 2 Xbox - specifically covers Halo 2 - secondary headline appears on "Halo 2" page
- Halo Xbox - specifically covers Halo 1 - secondary headline appears on "Halo" page
- Halo PC/Mac - specifically covers the PC or Mac version of Halo - secondary headline appears on "Halo PC/Mac" page
- Myth/Oni/Classic - news relating to these older Bungie games
- Halo Xbox Tournaments - announcements and news for Halo Xbox events - secondary headlines appear on "Halo Xbox" and "Community" pages
- Halo PC/Mac Tournaments - news about events and tournaments on the PC/Mac version of Halo - secondary headlines appear on "Halo PC/Mac" and "Community Pages"
- Halo 2 Tournaments - events and competitions for Halo 2 - secondary headline appears on "Halo 2" and "Community" pages
Summary Text
The summary text is the little blurb that appears on the front page of the site underneath the headline. This is the small taste that gives readers a quick overview of what the story is about and hopefully encourages them to read the full contents. This is a required field and can contain up to 400 characters.
Full News Story Text
This is the actual body of the story. When someone clicks the headline or the "Continues" link on the front page, they'll end up on a page with the full text for the news post. A news story can contain up to 3975 characters and has full support for the text markup functions available on Bungie.net. A full list of the available markup tags is available on the right side of the submit news page. These are also explained in greater deal in the Forums section of Help.
Preview / Submit
Once your story is typed up and the markup tags are added, you can hit the "Preview" button to see how it will look with all the formatting applied. A preview of your story will appear at the top of the page, exactly as it will appear on the site. If you don't like what you see, scroll down, make some changes, and try it again. Once you are satisfied with your story, hit "Submit News" to send it to the submission queue. Once a Bungie.net staff member has approved it, it will appear on the front page.
The Bungie.net forums have always been a popular place for fans to gather and share ideas, theorize about upcoming games and generally meet and mingle with other members of our Community. With the new Bungie.net site, our forums have been greatly enhanced to make the experience even more enjoyable.
Anyone can read the content of our forums, but only registered members can create new posts.
Currently there are 3 main forums and 2 secondary forums. They are:
- Bungie General: The Underground - This is the general, all purpose forum on Bungie.net. Discussions about Halo 2, Halo Xbox, old Bungie games and Bungie in general should take place here.
- Bungie.net Community - The official 7th Column forum and meeting place for 7th Column members to talk about their chapters and ways to improve the 7th Column. General community discussions are also allowed.
- Halo 3 – Join the discussion for the next Bungie game!
- Halo 2 - Dedicated forum for Halo 2 "general" and campaign related discussions.
- Optimatch Playlist - Give us valuable feedback and suggestions about the Halo 2 Xbox Live playlists.
- Halo 1 & 2 for PC - This forum is devoted strictly to Halo for the PC and Mac. This is the place to go for discussions about online play, dedicated servers, editing and any other topics specific to these versions of the game.
- Halo Combat Evolved - Kick it old school and talk about the original Halo for Xbox.
- The Gallery - From time to time, we will post wacky pictures here for people to view and then provide their own captions for.
- The News - This is the place to discuss news and top stories that have appeared on Bungie.net
- Voting Booth - Rock the vote. We'll post official polls and you get to share your opinion.
- The Classifieds - Promote and recruit for your 7th Column Chapter or Halo 2 Clan.
- The Flood - This is the off topic forum where you can discuss anything and everything on your mind, provided it doesn't break our rules.
The Bungie.net forums are broken up into 4 major components - the topic index, the create a new post window, the read post window and messaging. Each is described in more detail below.
9.1 Forum Index
When you click on the link to go to a particular forum, the first thing you will see is the forum index page. This page lists all of the active "threads" within the particular forum. A thread is a series of posts, all related to one central starting topic. Here is an example of the topic list page:
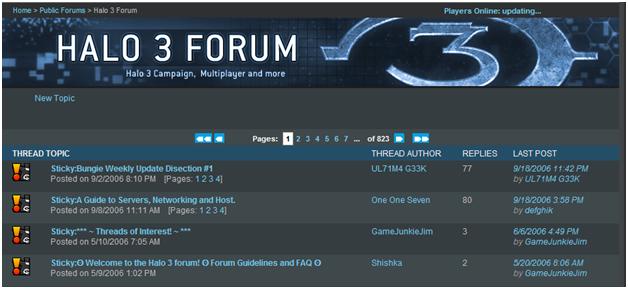
At the top of the page is the navigation to move between the various index pages. The more topics there are, the more pages there will be. The left most double arrow takes you back to page 1. The double arrow at the other end takes you straight to the last page. Using the single arrows allows you to move back or forward, one page at a time. Or, you can click directly on a specific page number to jump right to a certain page. The page numbers across the top will scale as you move forward or backwards and your current page will always be highlighted.
If you want to add a new topic to this forum, click the "new topic" button. Note - you have to be signed in for this button to be visible and your account needs to be at least one day old.
In the table itself, the content is sorted by date, with the most recent post being displayed at the top of the first page. You move backwards in time as you scroll through posts and to subsequent pages. The "replies" column indicates how many replies have been posted to the original topic.
The " thread topic" column indicates the name of the original topic as well as the author who posted it. Clicking on an author’s name in this view will take you to their profile page. Clicking on the topic itself will take you to a page listing all of the posts within that topic thread.
The far left column, contains special icons used to identify certain attributes of a post. These are explained in greater detail below.
9.2 Topic Icons
Several icons have been used to make it easier to identify posts and keep up with the information being presented on screen. Here's a breakdown of the icons and what each one means:
 |
New |
This icon shows up on any new topics that you haven't read yet. It's an easy way to keep up with what
you have and haven't read yet.
 |
 |
Hot |
A topic this is generating a lot of reponses in a short period of time. THis is probably worth checking out
to see what is causing such an uproar.
|
 |
Locked |
Sometimes a Bungie.net staff member or forum moderator may need to lock a thread that gets out of
hand. This usually happens when a topic takes a turn for the worse and somehow violates the rules of
our forum. New replies can't be added to a locked thread.
|
 |
Pinned |
Some forum topics are "pinned" (also known as "sticky") which keeps a particular topic locked to the
top of the list. This is useful for important forum threads. Only a Bungie.net staff member can pin a topic.
|
 |
Archived |
An old dead topic that has seen no action for many moons. This is effectively locked, but was not
done so due to unruliness.
|
 |
Bungie |
This thread contains a response from a Bungie official. Take heed.
|
9.3. Reading Forum Posts
If you find a topic that interests you, click on the topic name in the index list to go to the particular thread. The posts on this page are displayed chronologically, with the most recent being at the top. Every post within these pages all stem from the same original topic. At the very top of the page you will find navigation which is identical to what is found on the topic index list page. Use the arrows to navigate back and forth between available pages or click a page number to directly jump to a specific page.
Remember that each of these pages all contain related posts, stemming from the original founding topic. If you want to leave this "thread" and jump to a new topic entirely, you can click the forum banner which will take you back to the forum index. Or, you can create your own new topic from scratch.
Let's take a closer look at what you see when you click to read a post:
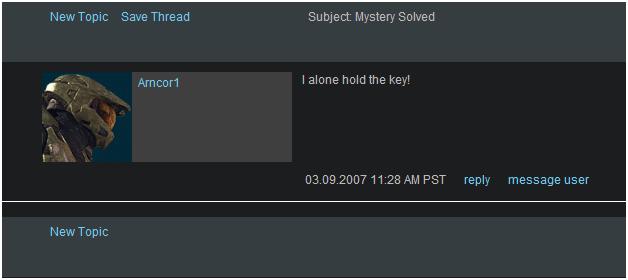
At the top and bottom of a forum thread page are buttons that allow you to create a "New Topic." Also at the top of each thread is a button that allows you to “Save Thread.” (More information on Saved Threads can be read about at Accounts and Settings.)
To reply to the topic, simply click “Reply.” If you are the author of this post or reply, an additional link will be provided to “Edit,” should this be a desirable option for you. If you wish to send a private message to a specific user, then click “Message This User."
Hovering your mouse over a player’s avatar will open a popup with information about the user. In the example below, we can see the Gamertag is visible, the homepage and Email are not listed (by player’s choice) and the player’s signature is written at the bottom.
Should you wish to see more posts contributed by this user, simply click “More Posts by This User.”

If you are reading a post that has a poll attached to it, you can cast your vote by simply clicking the appropriate response and then clicking "Vote." If you want to add some text to your reply, you will click "Reply" like you would for a normal post. If you're curious to see how many votes have been gathered, click on "View Results."
9.4 Creating a Topic
Sure, reading the forums is fun, but it's much more fun to actually be able to chime in with your own thoughts and interact with the other members of Bungie.net. Once you're logged in to the site, you'll be able to create your own posts from scratch or reply to existing posts.
To create your own post, either click on the "New Topic" button (to create a brand new topic) or "Reply" (to add to an existing thread).
Here's what the "create a new topic" screen looks like:
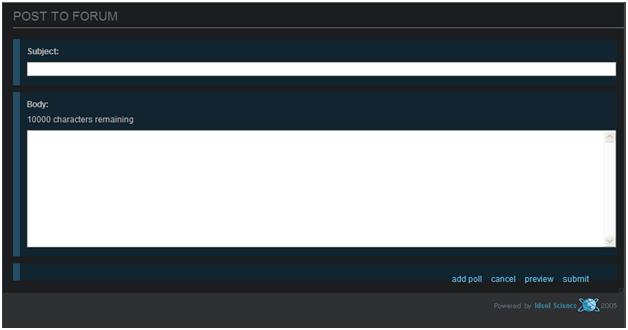
The first thing you need to do is enter the subject. This is a required field and is what will be displayed on the forum index page. Beneath that is the body; this is where you type in your content. Each forum post can contain up to 10,000 characters. As you type, the number of remaining characters will be displayed in the upper left corner.
When you're through typing, click the "Preview" button to see your formatted post exactly as it will appear on the site. You can perform any additional edits until it looks perfect. When it's final and ready to go, click the "Submit" button to make it go live for the world to see. If you change your mind and decide not to post, click on "Cancel" and it will all become a distant memory. What about the "Add Poll" button? More on that below.
Text Formatting
Forums would be a pretty boring place if they contained nothing but generic plain text. Luckily we have tools available to allow some basic formatting of text in both the forums and the news system. By using these "tags", you can create text that is bold, add hyperlinks and more. All of these tag options are listed on the right side of the page when you are on the "Create new post" screen. Here's a quick rundown of what's available:
- Bold: [b] text [/b]
- Italic: [i] text [/i]
- Underline: [u] text [/u]
- Hyperlink: [url]http://address.to.website[/url]
- Named Hyperlink: [url=http://address.to.website]text[/url]
- Email link: [email]value[/email]
- Blockquote: [quote]text to quote[/quote]
Here's an example of how these work. For a final outcome of this:
Text formatting is really neat. I love Bungie.net!
The input looks like this:
Text formatting is [b] really [/b] neat. I [i] love [/i] [url=http://www.bungie.net] Bungie.net! [/url]
As you create new posts, experiment with the different commands to create content that is more organized, visually exciting and easier to read!
Polls
A feature of the new Bungie.net forum is the ability to add polls to a regular forum post. This allows members to create polls and get other members responses on anything their heart desires. A poll can contain up to 8 different voting options. Adding a poll to a post is very simple!
One you've created the body of your post - the subject and any additional text, click on the "Add Poll" button. You will be taken to a screen that displays the basic parts of your post at the top and then a poll input forum below it.
Poll Question - What exactly are you asking people to vote on?
Poll Answers - What voting options do you want to give people to choose from? A maximum of 8 options can be entered. If you don't need all 8 slots, simply leave the extras blank.
Once you've entered the appropriate information, you can click on "Preview" to see your created poll, along with the base post it is attached to. The poll will always be displayed above your post content. Once it looks the way you want it to, click on "Submit" to make it appear on the site for everyone to see. That's it, you just created your very own poll.